

In this blog we share our experience in conversion rate optimization and everything that we faced along the way. PostHog, being our main tool in CRO, has a big effect on it, thus we talk about it a lot. We have installed PostHog on many tech stacks, WordPress being one of the most popular of them.
In this guide we will walk you through our experience in setting up PostHog on a WordPress site with any page builder; quickly and easily.
But before you begin, make sure you have these prerequisites met:
- Create your Posthog account, organization, & project
- Install a code manager plugin on WordPress (you can choose your best fit here.)
Step 1: Grab PostHog Snippet
Similar to step 1 in Installing PostHog on Shopify, start by grabbing your PostHog snippet from your project’s settings:
- Log in to your PostHog account.
- Navigate to Project Settings.
- Find the Web snippet section and copy the HTML snippet provided.
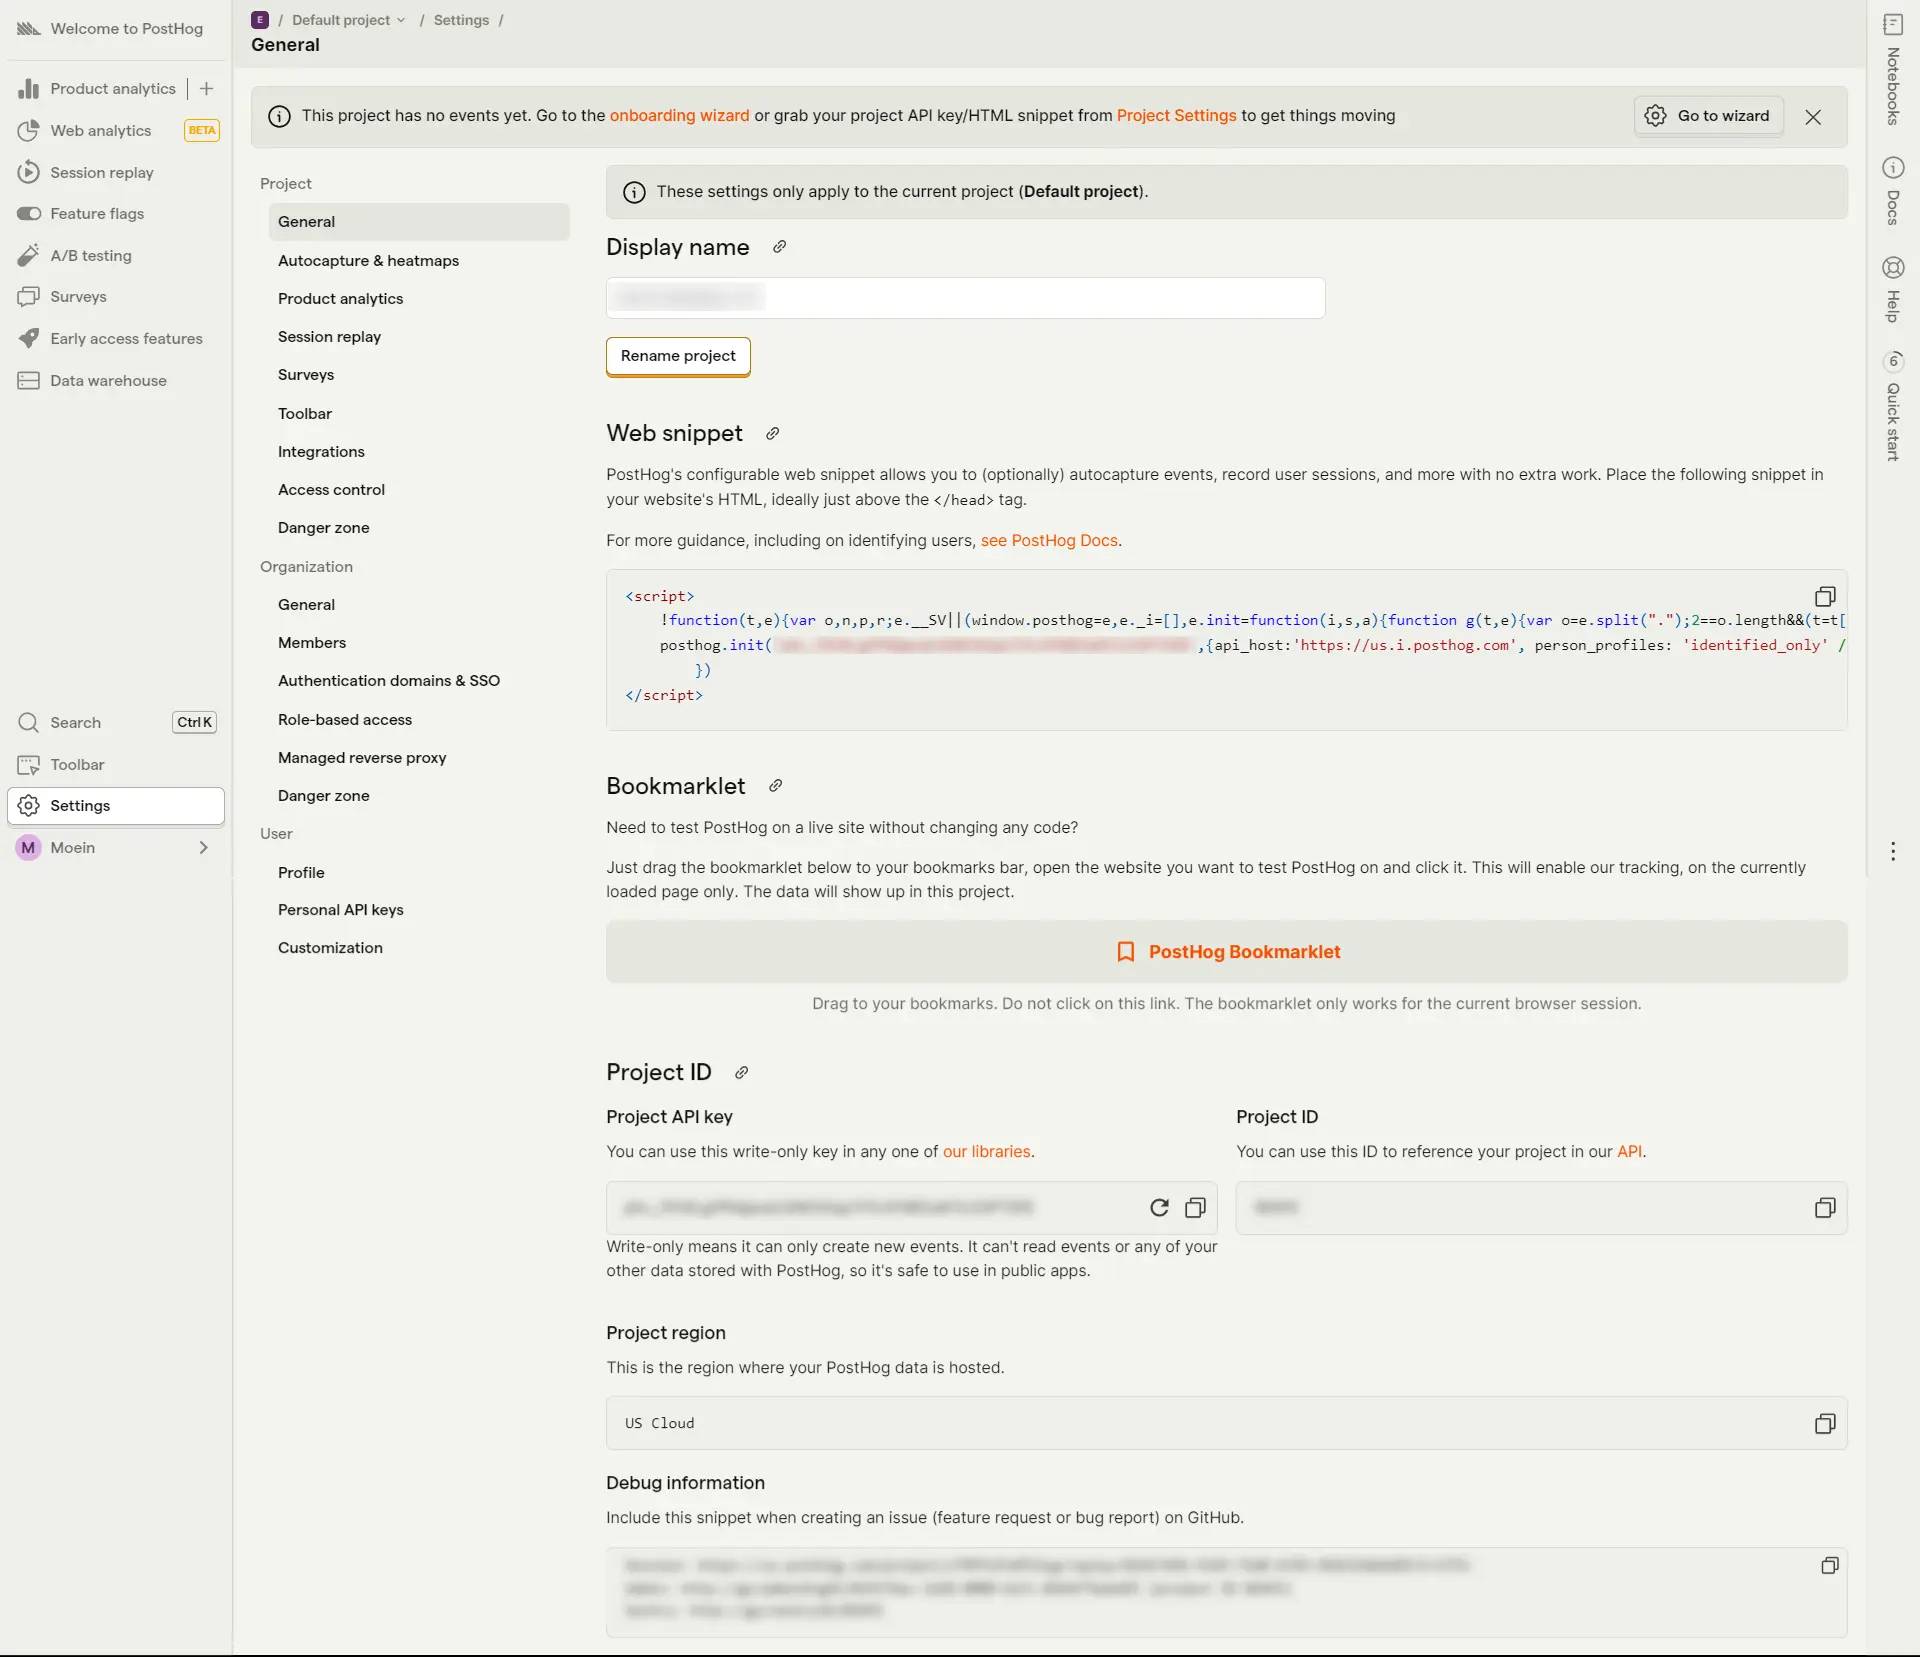
I also needed to change the “identified_only” to “always” for complete coverage of anonymous users. My final code looked like this:
Step 2: Add PostHog Snippet to My Website
I used the HFCM plugin for injecting my code into the website without worrying about losing it after a theme update or any change that might happen to my website. But you essentially can use anything as long as the snippet is available on the website.
I created a new snippet, pasted the snippet in it, made sure it applied to all pages of my site. And that’s all!

Step 3: Verify Installation
To verify your installation, visit the website, then head to the Activity section in your Posthog dashboard. You should be able to see the events (including your pageview) present there.
Step 4: Enhance Your Analytics (Optional)
Down the road we enhanced our analytics insights by adding these useful transformations from PostHog:
User Agent Populator: Enhances events with user agent details, offering valuable information about your users’ browsers and devices.
URL Normalizer: Tidies up URL formats, making it easier to compare insights and providing a cleaner view of your data.
URL Parameters to Event Properties: Converts URL query parameters to event properties, allowing you to track specific campaign parameters and traffic sources more accurately.

Conclusion
There are several ways to install PostHog on a WordPress site. To compare the best methods and choose what fits your setup, read our full guide on the most reliable PostHog installation options for WordPress.
By following these steps, you can integrate PostHog with your WordPress website to gain deeper insights into customer behavior and improve your conversion rates. Happy analyzing!
We’re here to help! Leave a comment or book a call; our co‑founder Iman will connect with you personally to understand your needs and guide you toward the best solution.
Frequently Asked Questions
Where exactly should I place the PostHog snippet in WordPress?
In most setups, you want the PostHog snippet to load:
In the
<head>or before</body>(depending on PostHog’s recommendation in your snippet),On all pages of your site (not just a single page or template).
In HFCM (or similar plugins), that means:
Create a new snippet.
Paste the full PostHog
<script>snippet.Set Location to the right hook (
HeaderorFooter).Set Display (or “Where to display”) to entire website / all pages.
This ensures consistent tracking of pageviews and events across the whole funnel.
Why did you change 'person_profiles' from 'identified_only' to always?
Changing person_profiles: 'identified_only' to person_profiles: 'always' tells PostHog to:
Create profiles for anonymous visitors as well, not just users you’ve explicitly identified (e.g., logged-in users).
Give you more complete coverage of user behavior, especially top-of-funnel visitors who never sign up or log in.
This is useful if:
You care about full-funnel CRO, not just logged-in behavior.
You want to analyze patterns for anonymous traffic and optimize landing pages, blog posts, and cold traffic funnels.
The trade-off: you’ll have more profiles and more data. That’s good for analysis, but you should still make sure it aligns with your privacy policy and data retention preferences.
Do I need a plugin like HFCM, or can I add the PostHog snippet manually?
You don’t have to use HFCM, but it’s usually safer and more maintainable.
Using a code manager plugin (like HFCM):
Pros:
Updates to your theme don’t wipe the tracking code.
Central place to manage all tracking snippets.
Easy to toggle on/off or scope to certain pages.
Cons:
Adds another plugin (very small overhead if you pick a lean one).
Adding manually (e.g., in header.php or a theme options “Custom Script” field):
Pros:
No extra plugin.
Cons:
You can lose the code when you change themes or update files.
Easier to make mistakes editing theme code.
Your article’s approach (HFCM) is the robust way for non-developers and most production sites.
How do I verify that PostHog is installed correctly on my WordPress site?
After adding the snippet:
Open your WordPress site in a normal browser window (not only in the admin panel).
Click around a couple of pages.
In PostHog, go to Activity (or Events) in your project.
You should see:
pageviewevents from your own visit.Session / event data appearing in near real-time.
If you don’t see any events:
Confirm the snippet is actually rendered in the page HTML (view page source, search for
posthog.init).Check that the API key and
api_hostare correctly copied from your Project Settings.Make sure caching or a security plugin isn’t stripping or blocking the script.
Test in an incognito window in case of aggressive browser extensions or ad blockers.
Will PostHog slow down my WordPress site?
Properly implemented, PostHog has minimal impact on performance:
The script is loaded asynchronously, so it doesn’t block page rendering.
It’s a single external script, similar to loading any other analytics tool.
To keep things clean:
Avoid adding duplicate PostHog snippets via multiple plugins or theme settings.
Keep your snippet in one place, ideally through a code manager like HFCM.
Combine this with general performance best practices (caching, image optimization, etc.) to keep Core Web Vitals healthy.
Can I track more than just pageviews, like form submissions or button clicks?
Yes. Pageviews are just the starting point.
Once your snippet is live, you can:
Use PostHog’s autocapture (if enabled) to track:
Button clicks,
Link clicks,
Form submissions, etc.
Or add manual events in your code, e.g.:
"posthog.capture('contact_form_submitted', {
page: window.location.pathname,
form_type: 'contact',
});"For CRO work, you’ll typically:
Define key events like lead submitted, checkout started, purchase completed, demo booked, etc.
Use these events in funnels, retention, and cohort analyses in PostHog to understand where your WordPress funnel leaks.


this is great, thank you for help!