

You can run a trustworthy PostHog A/B test on Shopify without installing a dedicated testing app. PostHog feature flags assign visitors and PostHog analyzes the result; the Shopify theme still has to apply the assigned experience safely on every eligible storefront template.
This guide shows the full review-first workflow: define the change, duplicate the live theme, resolve every template and selector, use the shared PostHog Page Experiments runner where it fits, add bounded readiness logic for late targets, preview every variation, validate the unpublished theme, and create the matching PostHog experiment as a draft.
The package removes repeated feature-flag, fallback, eligibility, and QA code. It does not replace Shopify-specific template analysis, asynchronous target handling, idempotency, or publication controls.
What You Need Before You Start
- A working PostHog project. If PostHog is not installed yet, compare the main Shopify PostHog integration methods before continuing.
- PostHog installed on the Shopify storefront so
window.posthogis available. - Shopify access that allows you to duplicate, customize, and edit themes.
- A clear description of what is being tested, the variations, what changes in each variation, and where those changes appear.
- A canonical feature flag key and variation keys that will be used identically in Shopify and PostHog.
- A downstream business event or funnel that can measure the experiment.
You do not need to know every final selector before starting. Finding and validating the real selectors in the theme source and rendered storefront is part of the workflow.
Step 1: Understand the Shopify Change
Before touching Shopify, answer four questions:
- What is being tested?
- Which variations exist?
- What changes in each variation?
- Where does each change appear in the storefront?
Keep the implementation narrow enough that the result is interpretable. A treatment can bundle several coordinated changes when that bundle represents one deliberate strategy, but the experiment should not accidentally combine unrelated edits.
Resolve the canonical feature flag key before coding. Use that exact key as the experiment slug in Shopify. For example:
Experiment: 026 - Product Page - Description Key Points
Feature flag: 026-product-page-description-key-points
Variations: control, test
For three or more variations, use stable machine keys such as control, test_group_1, and test_group_2. Descriptive labels belong in PostHog; the machine keys should remain short and unchanged after exposure begins.
Step 2: Duplicate the Current Live Shopify Theme
Never implement experiment code directly on the live theme. There is no exception for a small copy change or a script that appears easy to reverse.
In Shopify admin, go to:
Sales channels -> Online Store -> Themes
- Identify the current live theme.
- Open its actions menu and select Duplicate.
- Give the duplicate a clear experiment name.
- Record the unpublished theme name and theme ID.
- Open Customize on the duplicate and confirm that you are not editing the live theme.
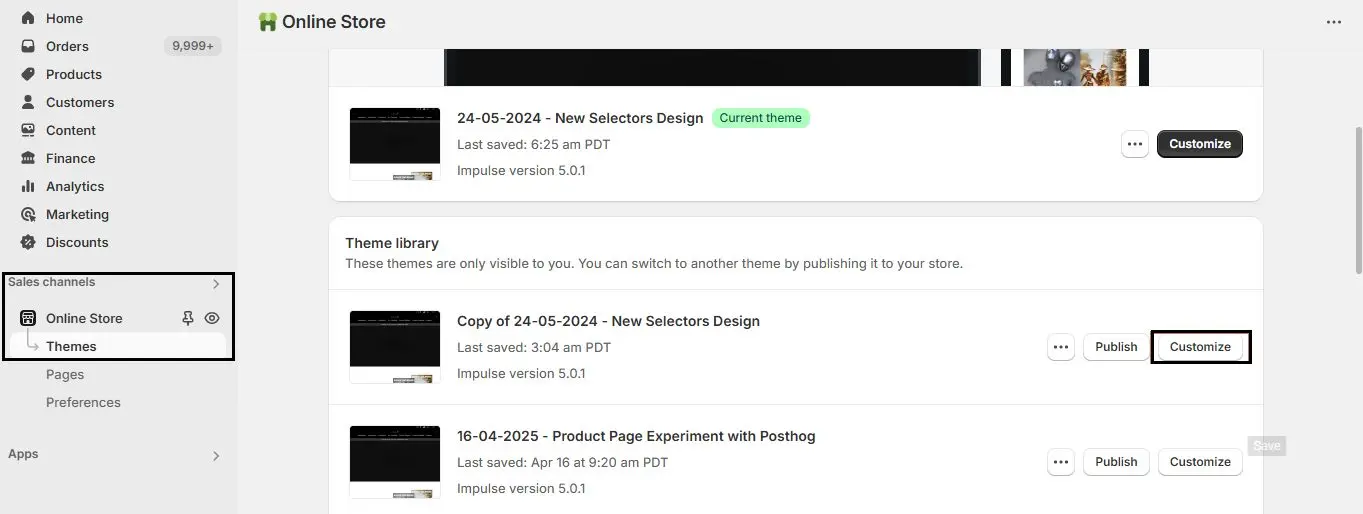
You can reuse an existing experiment theme only after confirming that it is unpublished and still contains the intended baseline. Before changing a theme file or Custom HTML block, read its current contents and preserve unrelated code. Established stores often reuse one experiment container for several tests.
Step 3: Choose the Correct Experiment Code Location
Use the narrowest standard location that covers the experiment. Shopify’s JSON templates documentation explains how template sections are rendered:
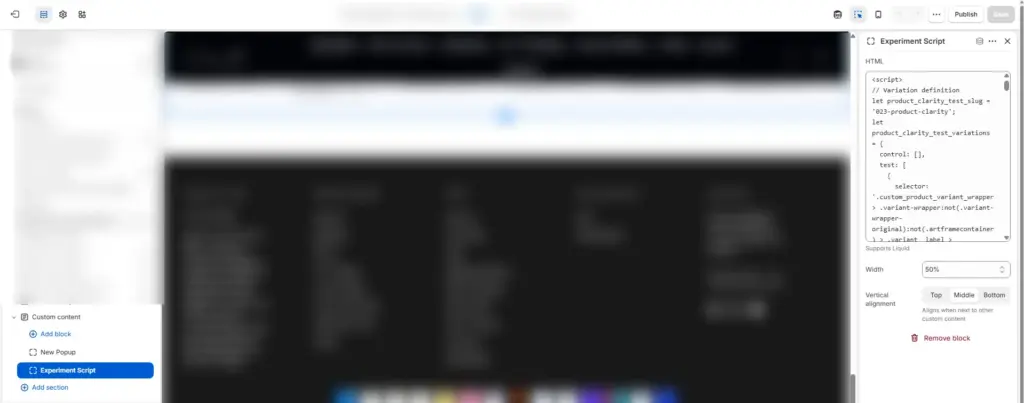
- Product-page experiment: reuse the product template’s existing Custom HTML section. Many established themes already have one for experiment scripts.
- Other template-specific experiment: use that template’s Custom HTML or equivalent Custom Liquid section.
- Site-wide experiment: use the header or footer according to where the change belongs.
- Global early-running code: use
theme.liquidonly when the code genuinely must run everywhere or before the normal sections render.
A Custom HTML section can remain visually hidden while serving as the script container, but verify that the theme still renders and executes its contents. The container must not introduce visible spacing or content.
Step 4: Resolve Every Template and Selector
Do not assume that one product template, section ID, or selector represents the entire storefront.
- List every Shopify template and template suffix where the experiment should run.
- Find the relevant section, block, code setting, or target element in each template.
- Open a representative storefront URL for every affected template.
- Compare the IDs in the theme source with the IDs rendered in the browser DOM.
- Confirm that every selector matches the intended element exactly once.
- Record template-specific selector or mount differences instead of forcing one selector everywhere.
Watch for Shopify’s dynamic ID suffixes
Some Shopify themes append a dynamic suffix to a fixed source ID, commonly separated by a double underscore. For example, an ID defined as Block-description can render as Block-description__abc123.
/* The rendered ID stays unchanged */
#Block-description

/* The rendered ID becomes Block-description__<dynamic-suffix> */
[id^="Block-description__"]
Use the starts-with selector only after confirming that the theme actually generates the suffix. When more than one element could match, scope the selector to the nearest stable container.
Swap tests and existence tests need different control logic
- Swap test: the existing control element and treatment element both have selectors.
- Existence test: control preserves the existing storefront and may not need its own selector. The treatment introduces or reveals the new element.
- DOM-mutation test: control leaves the current element unchanged while the treatment changes its copy, attributes, order, or behavior.
Do not duplicate a control element merely to satisfy a generic script structure. The correct control behavior is always to preserve the existing storefront.
Step 5: Implement the Variations with the Shared Experiment Runner
Keep each experiment in one bounded theme block and use the PostHog feature flag key as its slug. For targets present when the page becomes ready, the runner can handle the common execution path without recreating it for every test.
The implementation below uses PostHog Page Experiments, a free, MIT-licensed JavaScript package from 99Ways. PostHog still assigns visitors and analyzes the experiment; the package handles DOM readiness, the eligibility check, safe fallback, variant execution, and URL-based QA. It is also available as @99ways/posthog-page-experiments on npm.
<script src="https://cdn.jsdelivr.net/npm/@99ways/[email protected]/dist/posthog-page-experiments.min.js"></script>
<script>
window.runExperiment('026-product-page-description-key-points', {
  variants: {
    control: [],
    test: [
      {
        selector: '[data-experiment-control]',
        updates: { style: { display: 'none' } },
      },
      {
        selector: '[data-experiment-test]',
        updates: { style: { display: 'block' } },
      },
    ],
  },
}).catch(error => console.error('Experiment error:', error))
</script>
Replace the example selectors with values verified in both the theme source and rendered storefront. Hide the treatment safely by default and leave control unchanged. The package applies each configured style with !important.
Step 6: Add URL Parameters That Force Every Variation
The runner already implements deterministic URL previews. Use the feature flag key as the query-parameter name and a configured variant key as its value:
?026-product-page-description-key-points=testCombine it with Shopify’s unpublished-theme parameter:
https://example.com/products/example-product?preview_theme_id=123456789&026-product-page-description-key-points=testA valid forced variation takes precedence over PostHog and does not request a feature flag assignment. Eligibility still runs first. With the current package API, an unknown URL value falls back to the configured default variant—control in this guide—rather than continuing to normal PostHog assignment.
Create a complete preview URL for control and every treatment on every affected template. Keep the PostHog experiment as a draft during this review.
Step 7: Create the Matching PostHog Experiment
Create the PostHog experiment only after the unpublished Shopify implementation validates. Keep it as a draft and verify that its feature flag key and variation keys exactly match the theme code.
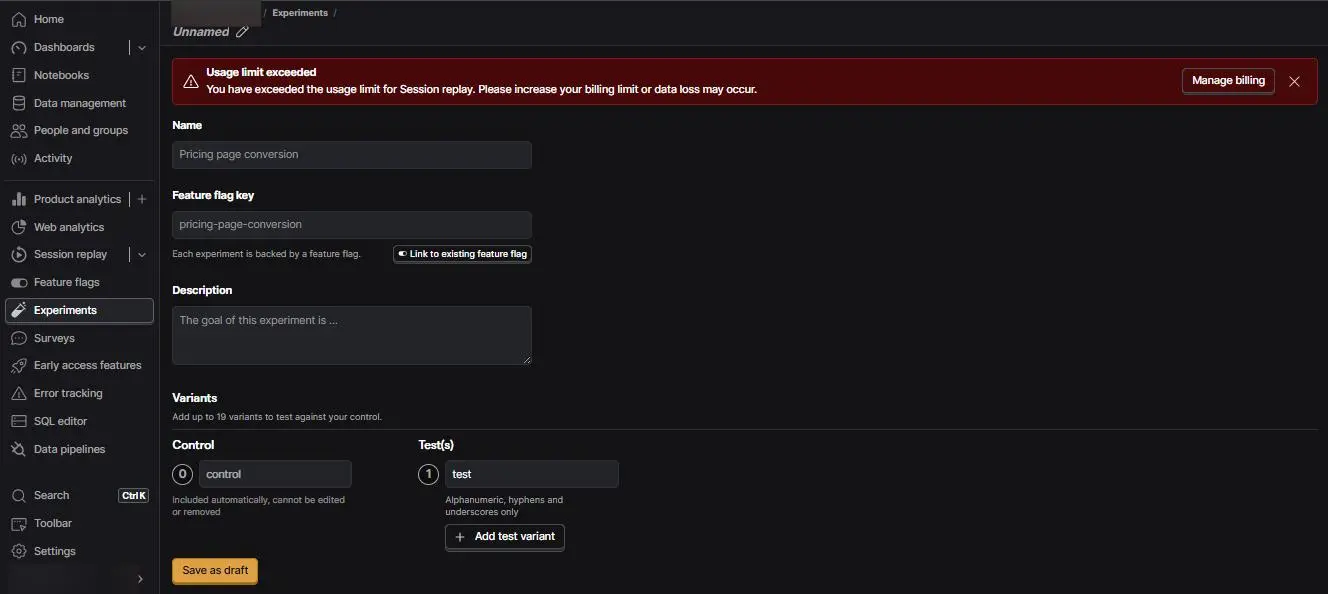
Choose Match by Device for normal Shopify storefront traffic
Most Shopify storefront visitors are anonymous and identified through a browser or device cookie. For that architecture, set PostHog’s Match by setting to Device.
Use User only when the store has a verified persistent account identity, participants are consistently identified before the flag is evaluated, and the same external ID returns them to their original PostHog profile across sessions and devices.
PostHog person records, distinct_id values, and $identify events do not prove that User matching is appropriate. Verify the real identity architecture before configuring release conditions. When anonymous and authenticated traffic are mixed without guaranteed continuity, use Device unless the experiment is explicitly restricted to reliably identified users.
Complete the experiment configuration
- Keep the variation split stable, usually 50/50 for an A/B test.
- Use rollout percentage to control release risk instead of changing variation weights.
- Add release conditions only after identity and eligibility are verified.
- Evaluate the flag at the user-visible treatment boundary.
- Use a semantic exposure event when feature flag evaluation does not prove that the visitor could actually see the change.
- Choose a primary metric with the correct eligible denominator.
- Document overlapping experiments that affect the same population or storefront surface.
Purchase is usually the strongest business outcome for a revenue experiment, while add to cart or checkout started can provide useful secondary evidence. Do not automatically use $feature_flag_called as the first funnel step: it is valid exposure only when the flag is evaluated for an eligible visitor at the moment the tested experience becomes available.
What Happens After the Setup Is Approved?
The setup workflow ends with a validated unpublished theme and an unlaunched PostHog experiment. Publishing and launch are separate approval-gated actions.
- Obtain explicit approval for the validated unpublished theme.
- Reconfirm that the approved theme has not changed.
- Publish it.
- Verify the live storefront, affected actions, event capture, and exact feature flag.
- Launch the PostHog experiment only after the live implementation is confirmed.
Do not let “QA is complete” become automatic permission to publish. The unpublished preview handoff exists so the implementation can be reviewed before it becomes production code.
Common Mistakes to Avoid
Editing the live theme directly
Every experiment starts on an unpublished duplicate. Small changes are not exempt.
Using one selector without checking every template
Product template suffixes and page-builder variants can render different sections or IDs. Verify representative URLs individually.
Applying a wildcard to every Shopify ID
Use a starts-with selector only when the rendered DOM actually adds the dynamic __ suffix.
Making the experiment script global without need
A product-page experiment belongs in the product template’s experiment container, not automatically in theme.liquid.
Letting forced previews request PostHog assignments
Apply a valid forced variation and return before evaluating the PostHog feature flag.
Using Match by User because PostHog has person records
Anonymous cookie-based Shopify traffic should normally use Device. User requires a verified persistent identity architecture.
Running overlapping experiments on the same element
Each experiment needs its own bounded block, feature flag key, variation keys, and namespace. Avoid competing changes on the same surface unless interaction is explicitly part of the design.

Why This Workflow Produces Better Shopify Experiment Data
A trustworthy result begins before the first production visitor is assigned. Safe theme isolation prevents accidental changes. Verified selectors prevent missing or mixed treatments. Deterministic previews make review reproducible. Correct identity matching prevents unstable assignment. Exposure and metric checks make the PostHog result correspond to the experience visitors could actually see.
That is the difference between changing a Shopify page and running an experiment that can support a business decision.
Frequently Asked Questions
Can I run a PostHog A/B test on Shopify without an A/B testing app?
Yes. PostHog can assign and analyze the experiment while PostHog Page Experiments applies suitable page-level variants. Shopify-specific template, selector, readiness, idempotency, and publication checks are still required.
Can I add the experiment directly to the live Shopify theme?
No. Build and validate it on an unpublished duplicate of the current live theme. Publish only after the preview has been reviewed and approved.
Where should product-page experiment code go?
Use the product template’s existing Custom HTML section when available. Reuse the established experiment container and preserve any unrelated scripts already inside it.
When should experiment code go in theme.liquid?
Only when it genuinely needs to run globally or before normal header, footer, and template sections render. Template-specific experiments should remain template-scoped.
How do I target a Shopify ID with a dynamic suffix?
Compare the source ID with the rendered DOM. If Shopify changes Block-description to Block-description__abc123, use [id^="Block-description__"] and scope it when necessary. Do not use that wildcard unless the suffix is actually present.
Does control always need its own CSS selector?
No. In an existence test, control may simply leave the current storefront unchanged while the treatment adds or reveals a new element. In a swap test, both control and treatment can have selectors.
How do I force a variation on an unpublished theme?
Use the runner’s built-in query parameter: its name is the feature flag key and its value is a configured variation key. Combine it with Shopify’s preview_theme_id parameter. Eligibility runs first, and a valid forced value is applied without requesting a PostHog assignment.
Should a normal Shopify experiment use Match by Device or User?
Use Device for anonymous or cookie-based storefront tracking. Use User only when a verified persistent account identity reliably restores participants to their original PostHog profile and the flag is evaluated after identification.
What happens when PostHog does not load?
The runner falls back to its configured default after the feature-flag timeout. With control as the default and treatments hidden safely, an analytics or flag failure does not break the buying experience.
Can multiple experiments share one Custom HTML section?
Yes. Give every runExperiment() call its own bounded block, feature flag key, selectors, and namespace. Preserve unrelated calls and avoid experiments that compete over the same element.
What is the best primary metric for a Shopify experiment?
Use the most decision-relevant downstream outcome supported by the store’s traffic and buying cycle. Purchase is strongest for revenue tests; checkout started and add to cart can provide useful secondary evidence. Make sure the denominator contains visitors who were eligible and genuinely exposed.
How do I know the unpublished implementation is ready?
Every variation renders correctly on every affected template, eligibility excludes missing targets before flag evaluation, selectors match as intended, custom changes are idempotent, storefront actions still work, console errors are clear, the complete preview URLs are shareable, and the theme is still unpublished.
External & Internal References
- PostHog Page Experiments on GitHub
- PostHog Page Experiments on npm
- How to install PostHog on Shopify
- How to set up a PostHog A/B test on WordPress
- PostHog Experiments documentation
- PostHog’s Shopify documentation
- Shopify theme documentation





Subject: Great guide, but a few clarifications needed for Step 5 & Multiple Tests
Hi Amin,
Thanks for this guide! It’s one of the few that actually breaks down the coding side of PostHog for Shopify.
However, I ran into a few confusing spots while implementing this, specifically regarding Step 5 and setting up multiple concurrent tests. I thought I’d share them here to help you update the post or help future readers:
1. Confusion on “Control” IDs in Step 5
The text in Step 5 says: “Replace ‘variant-one-element’ with the actual CSS IDs of the control.”
However, the code snippet uses control: [] and test_group_1.
It would be helpful to clarify that there are two types of tests:
Swap Tests (e.g., changing a headline): You must put the Original Element ID inside control: [‘old-id’] and the New Element ID in test_group_1.
Existence Tests (e.g., adding a new review widget): If you are adding a brand new element that didn’t exist before, the control array should be left empty: control: []. I was stuck looking for a control ID for a new element until I realized I didn’t need one!
2. Running Multiple Tests
Please also explain how we’re going to do multiple tests on one page. If you can explain that with example, it would be very beneficial.
Thanks again for the resource!