

Running an A/B test on WordPress with PostHog requires two connected pieces: PostHog assigns visitors and analyzes the result, while the WordPress page applies the assigned experience. The difficult part is making that browser-side change without exposing ineligible visitors, showing multiple variants, or failing when a flag is late.
This guide shows the complete workflow for an existing WordPress page: prepare the experiment, build the modules, connect them with the open-source PostHog Page Experiments runner, preview every variant through the URL, deploy the validated implementation, and only then launch the experiment in PostHog.
The example uses Divi, but the same approach works with another builder when it provides stable selectors and a safe place for page-specific JavaScript.
What You Need Before You Start
Before you build the experiment, make sure these pieces are already in place:
- A working PostHog project.
- PostHog installed on the WordPress site. If not, follow this PostHog installation guide for WordPress to set it up quickly.
- Access to the WordPress page you want to test.
- Permission to edit the page template or builder modules.
- A clear test hypothesis.
- A conversion event or funnel in PostHog that can be used as the primary metric.
- The exact page, section, or module you want to change.
If PostHog is not installed yet, install it first. The browser example assumes an initialized global window.posthog client. If your WordPress build uses JavaScript modules instead, install @99ways/posthog-page-experiments and import runExperiment from the package.
Decide What You Are Testing
Do not start by duplicating random modules. Start with the experiment question.
For example:
- Does a clearer hero headline increase form visits?
- Does a shorter CTA section increase button clicks?
- Does changing the webinar framing improve opt-ins?
- Does replacing a pricing block reduce drop-off?
Keep the first version of the test narrow. If you change the headline, CTA, layout, and pricing copy at the same time, PostHog may tell you which variant won, but it will not tell you why.
A clean test plan should include:
- The page being tested.
- The control version.
- The test variant or variants.
- The primary conversion event.
- The expected business outcome.
Example:
We are testing whether a more specific above-the-fold headline increases visits to the lead form on the About page.
Step 1: Duplicate the WordPress Page
In WordPress, duplicate the page you want to test before editing anything.
In the WordPress dashboard:
- Go to Pages.
- Find the page you want to test.
- Duplicate it using your normal page duplication tool, such as Yoast Duplicate Post or another approved duplicate-page plugin.
- Rename the copied page so it is easy to identify, such as
About Page - PostHog Test. - Keep the copied page unpublished, password-protected, or otherwise hidden until QA is complete.
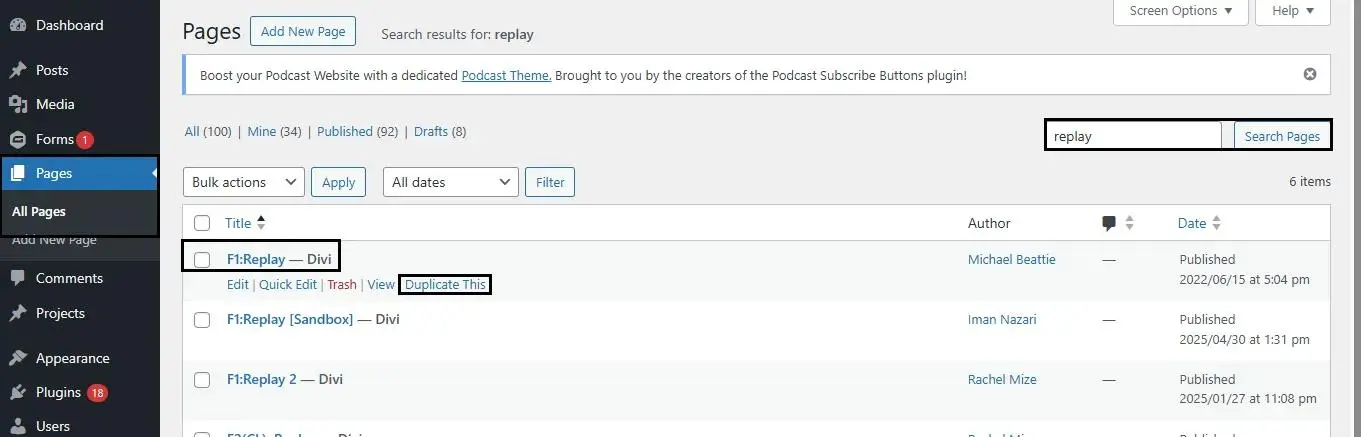
This protects the live page while you build the experiment. It also gives you a clean space to prepare the control and test modules without disrupting real visitors.
Step 2: Create the Experiment in PostHog
PostHog experiments use feature flags behind the scenes. That feature flag is what your WordPress page will read to decide which module to show.
In PostHog:
- Open Experiments.
- Click New experiment.
- Add a clear experiment name.
- Set the feature flag key.
- Add your control and test variants.
- Save the experiment as a draft.
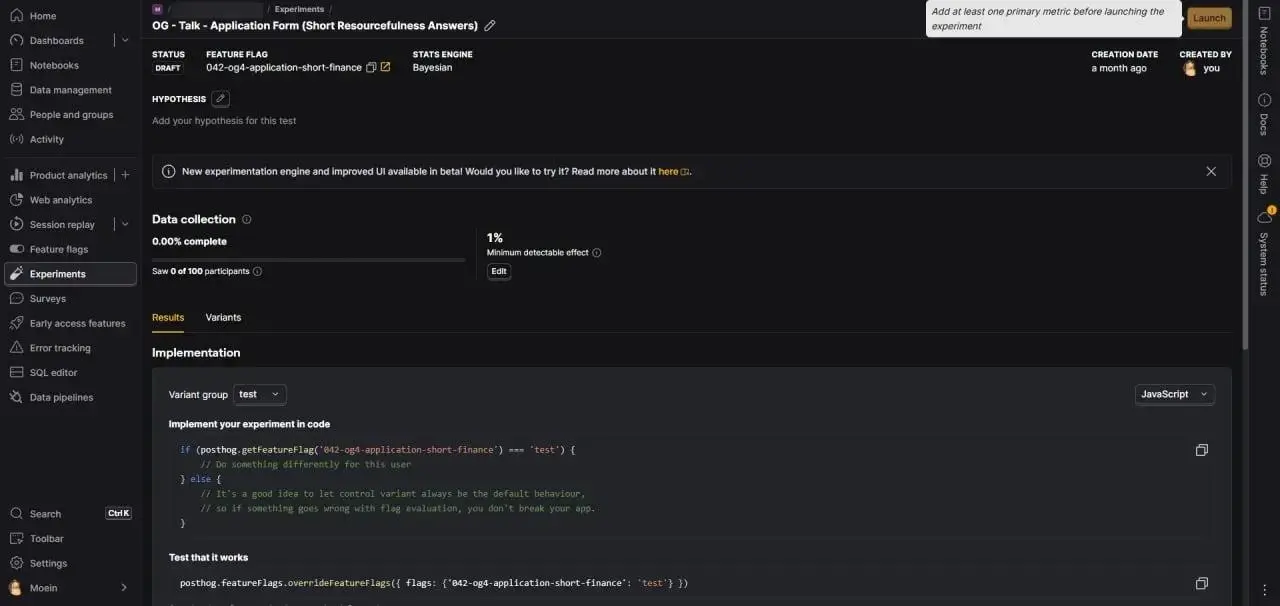
Use a naming format that stays readable later:
[Experiment number] - [Funnel step or page] - [Test hypothesis]
Example:
001 - About page - Heading clarity test
For the feature flag key, use a code-friendly version:
001-about-page-heading-test
Keep variant keys short and predictable:
control
test_group_1
test_group_2
The feature flag key matters because it must match exactly in your WordPress script. A typo in the key is enough to make every visitor fall back to the wrong version.
Step 3: Create the Variant Modules in WordPress
Now build the content variants on the duplicated WordPress page.
If you are using Divi Builder, open the duplicated page and find the module or section you want to test. Duplicate that module once for each test variant. For the same PostHog A/B testing workflow in ClickFunnels, see our ClickFunnels A/B test guide.
For a three-way test, you might have:
Control: the original module.TG1: the first test version.TG2: the second test version.
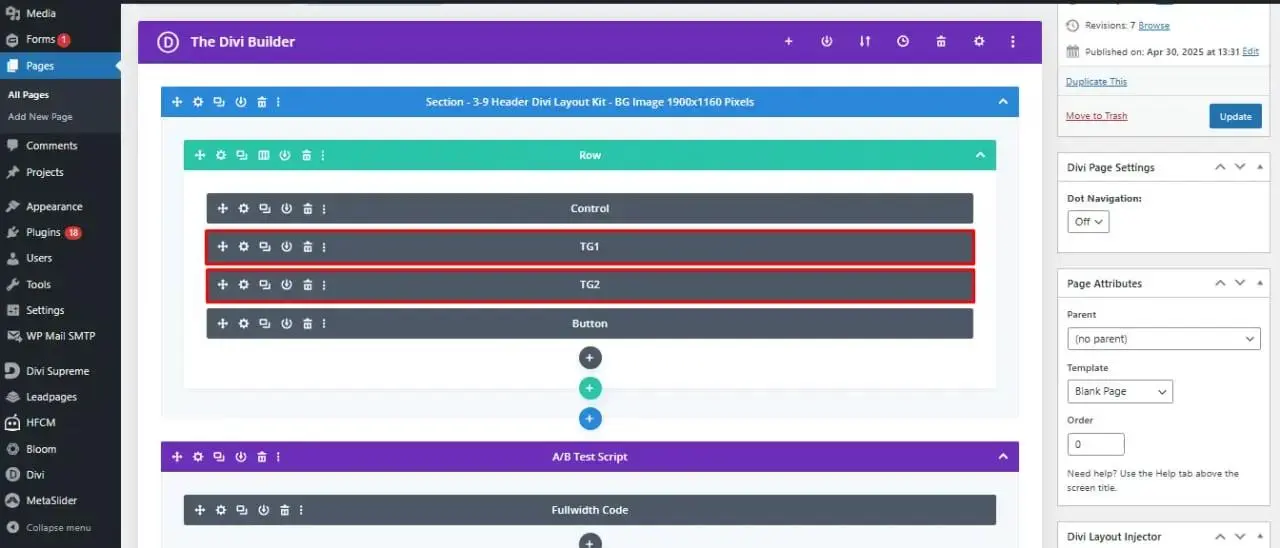
Each module should contain only the change you want to test. If the test is about a heading, keep the surrounding layout, spacing, buttons, and form behavior the same.
Step 4: Give Each Variant a Unique CSS ID
Your script needs stable selectors so it can hide and show the correct module.
In Divi:
- Open the module settings.
- Go to Advanced.
- Open CSS ID & Classes.
- Add a unique CSS ID.
Example IDs:
experiment-control
experiment-tg1
experiment-tg2
Use IDs that describe the experiment, not the design. Avoid IDs like blue-heading or new-copy, because they become confusing once the test changes or gets reused.
Step 5: Hide Test Variants by Default
The test variants should be hidden before the PostHog flag response is available. This reduces the chance that visitors briefly see the wrong version while the page is loading.
In Divi:
- Open the settings for each test-group module.
- Go to Advanced.
- Open Custom CSS.
- In Main Element, add:
display: none !important;
Apply this to the test variants, such as TG1 and TG2.
Leave the control visible by default and hide only the treatment modules. That keeps the original page usable when JavaScript or PostHog does not load. The runner applies its treatment display styles with !important, so it can reveal the assigned module after the flag resolves.
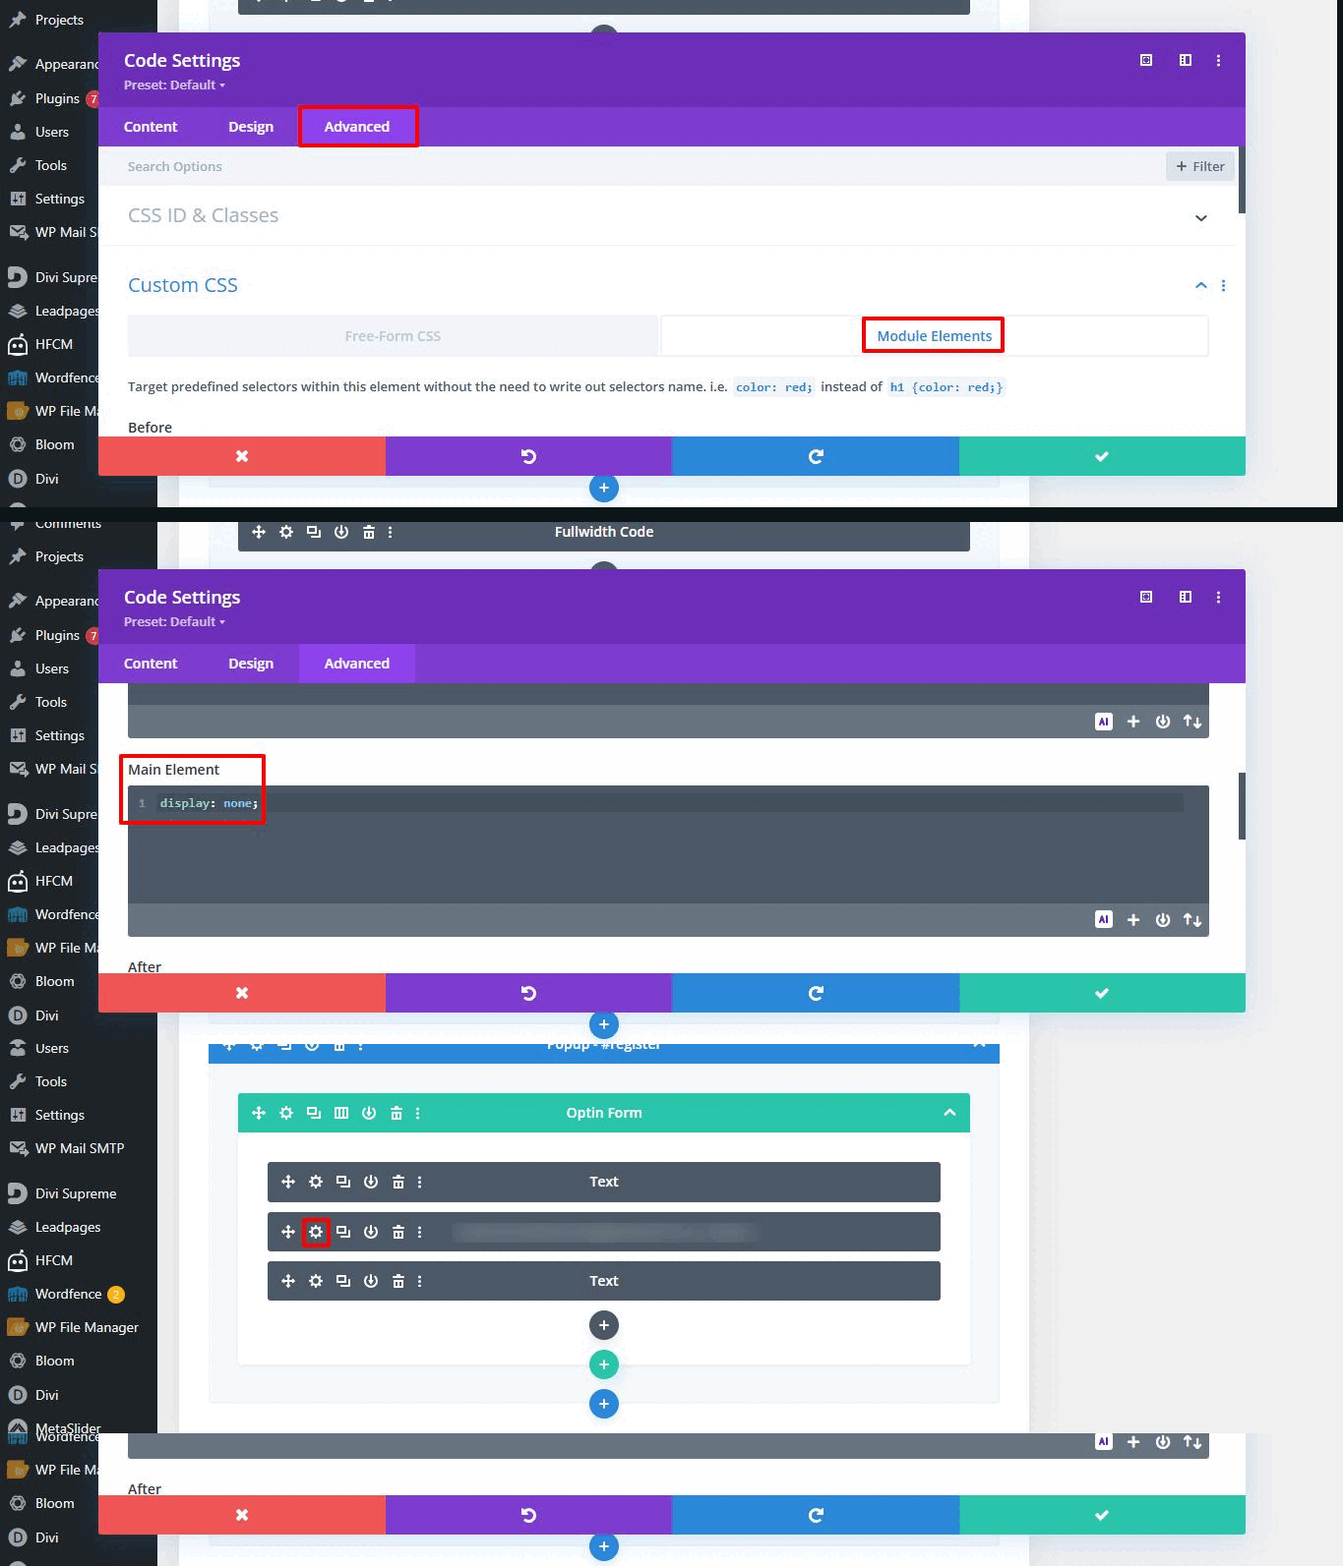
If you are not using Divi, add display: none; to the test variant elements through your builder, theme CSS, or custom CSS field.
Step 6: Add the Experiment Runner
Add the version-pinned browser bundle and experiment configuration near the bottom of the duplicated page, preferably in a code module just above the footer or another page-specific script area. Pinning the version keeps the tutorial reproducible while the package is still pre-1.0.
The implementation below uses PostHog Page Experiments, a free, MIT-licensed JavaScript package from 99Ways. PostHog still assigns visitors and analyzes the experiment; the package handles DOM readiness, the eligibility check, safe fallback, variant execution, and URL-based QA. It is also available as @99ways/posthog-page-experiments on npm.
<script src="https://cdn.jsdelivr.net/npm/@99ways/[email protected]/dist/posthog-page-experiments.min.js"></script>
<script>
window.runExperiment('001-about-page-heading-test', {
  variants: {
    control: [],

    test_group_1: [
      {
        selector: '#experiment-control',
        updates: { style: { display: 'none' } },
      },
      {
        selector: '#experiment-tg1',
        updates: { style: { display: 'block' } },
      },
    ],

    test_group_2: [
      {
        selector: '#experiment-control',
        updates: { style: { display: 'none' } },
      },
      {
        selector: '#experiment-tg2',
        updates: { style: { display: 'block' } },
      },
    ],
  },
}).catch(error => console.error('Experiment error:', error))
</script>
Replace the feature flag key and selectors with the exact values from your PostHog experiment and WordPress modules. Keep the same variant keys in both places.
The empty control: [] handler deliberately leaves the original page unchanged. A late, disabled, missing, or unknown flag also falls back to control.
Step 7: QA Every Variant Before Launch
Do not launch the experiment until every variant has been checked on the page. The runner accepts a URL parameter whose name is the feature flag key and whose value is a configured variant:
https://example.com/about/?001-about-page-heading-test=control
https://example.com/about/?001-about-page-heading-test=test_group_1
https://example.com/about/?001-about-page-heading-test=test_group_2
A configured URL variant takes precedence over PostHog, so reviewers can inspect it before the experiment is launched. Eligibility still runs first. An unknown variant falls back to control.
- Control renders correctly and remains the no-script fallback.
- Each treatment renders correctly, and only one version is visible.
- The exact feature flag key and variant keys match PostHog.
- Mobile, tablet, and desktop layouts work without an unacceptable control-to-treatment flash.
- The conversion action still works.
- Normal non-forced visits evaluate the feature flag and send the intended pageview and conversion events.
- No relevant browser-console errors appear.
Use forced URLs for visual review, then perform a separate normal-assignment check without the query parameter. For a deeper measurement review, use the conversion tracking audit, experimentation system audit, and PostHog audit checklist.
Step 8: Set the Primary Metric in PostHog
Before launching, choose the metric that decides whether the test worked.
For a WordPress landing page, the primary metric is usually one of these:
- Form visit.
- Form submit.
- CTA click.
- Checkout visit.
- Purchase.
- Lead created.
- Booking completed.
In PostHog:
- Open the draft experiment.
- Go to Primary metrics.
- Click Add primary metric.
- Choose the metric type.
- Configure the event or funnel.
- Set the attribution type and conversion window.
- Save the metric.
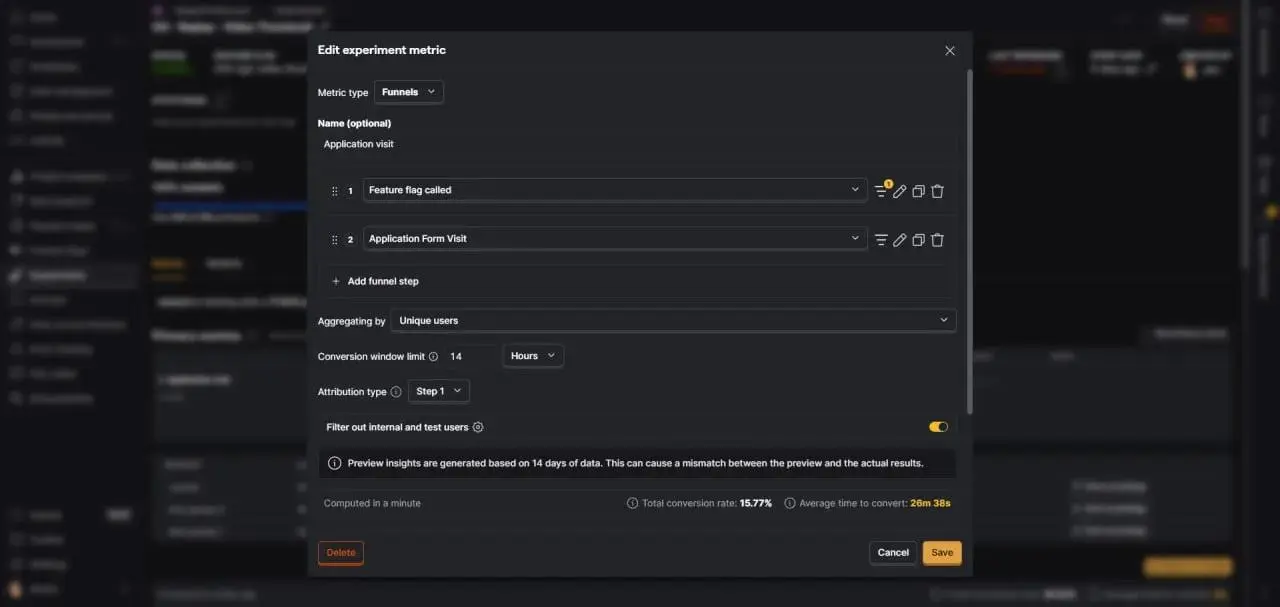
One possible funnel is:
Feature flag called -> Form visit

or

Feature flag called -> Form submit
Do not automatically treat $feature_flag_called as valid exposure. It is suitable only when isEligible() accurately represents visitors who can receive the experience and the flag is evaluated at the user-visible treatment boundary. Otherwise, define a semantic exposure event that proves the tested experience became available.
Use the conversion action that best matches the business decision. If the test changes a hero heading, a form visit may be useful. If the test changes pricing or offer framing, a form submit, purchase, or qualified lead event is usually better. For a deeper framework for choosing an experiment metric, read our A/B testing metrics guide.
Step 9: Move the Validated Implementation Into Production
Keep the established live URL whenever possible. After the duplicated page passes QA, copy the validated modules, treatment-hiding CSS, and experiment runner into the existing live page, or deploy them through your normal staging-to-production workflow.
Do not make swapping the original and duplicated page slugs the default deployment method. A URL switch can affect internal links, canonicals, redirects, caches, forms, and search visibility. Use it only as a planned migration with its own checks.
Before the production write, record the live page, experiment flag, variant keys, selectors, primary metric, implementation version, and rollback steps. Then verify the live page while the PostHog experiment is still a draft.
- Control is still the default when the runner or PostHog is unavailable.
- Every forced variant works on the live URL.
- Normal traffic evaluates the intended flag only on eligible pages.
- The page action and conversion event still work.
- Caches and optimization plugins are not serving the pre-experiment markup or script.
Step 10: Launch the Experiment
Launch only after the implementation is live and the normal-assignment check succeeds. In PostHog, reconfirm the traffic split, variants, release conditions, primary metric, and conversion window, then click Launch.
After launch, verify real activity, feature flag calls, assignments, and conversion events. Do not change the variants mid-experiment unless you are correcting a documented implementation defect.
How to Verify the Setup in PostHog
After the experiment is live, verify the data instead of assuming the setup worked.
Check these areas:
- Activity: confirm visitor events are arriving.
- Feature flag calls: confirm the experiment flag is being evaluated.
- Experiment results: confirm users are being assigned to variants.
- Funnels: confirm the primary conversion event appears after the flag call.
- Session recordings: review a few sessions to check visual behavior.
Success looks like this:
For segment-level interpretation, see our metric breakdowns guide.
- Visitors see one version of the tested section.
- The same visitor keeps the same assigned variant.
- The primary metric receives events.
- Experiment results begin populating in PostHog.
- There are no obvious layout shifts or broken modules.
Common Mistakes to Avoid
Using the wrong feature flag key
The feature flag key in WordPress must match the PostHog experiment exactly. Even one different character can break the assignment logic.
Showing variants before flags load
If all modules are visible by default, visitors may see content flash or multiple variants. Hide test variants by default and wait for feature flags before switching modules.
Testing too many changes at once
A/B testing is most useful when the change is isolated. If you change several major elements in one variant, the result becomes harder to interpret.
Forgetting mobile QA
WordPress builder modules often behave differently across breakpoints. Check mobile and tablet before launch.
Choosing a weak primary metric
A click can be useful, but it may not prove business impact. When possible, use the closest reliable conversion event to the outcome you care about.
Publishing before PostHog events are verified
Do not wait until the end of the experiment to discover the metric was not firing. Verify events immediately after launch.
Changing variants during the experiment
Avoid editing the tested content mid-experiment unless there is a clear bug. Changing a variant after launch can make the result harder to trust.

Why This Matters for CRO
A WordPress A/B test is only useful if the assignment, display logic, and conversion tracking are clean.
PostHog can help you measure which variant performs better, but it cannot fix a messy implementation. If visitors see the wrong module, if conversion events are missing, or if the metric does not match the business goal, the experiment result becomes less useful.
The value of this setup is not just that a different heading or CTA appears. The value is that the experiment creates decision-quality data:
- Which version did visitors see?
- What did they do next?
- Did the change improve the conversion path?
- Is the result strong enough to keep, iterate, or reject?
That is the difference between running a visual test and running a CRO experiment.
Frequently Asked Questions
Can I run PostHog A/B tests on WordPress?
Yes. PostHog can assign visitors and analyze the result while WordPress renders the page. The implementation still needs stable selectors, a safe control fallback, eligibility checks, and verified conversion events.
Do I need a WordPress A/B testing plugin?
Not necessarily. PostHog handles the experiment, and PostHog Page Experiments can connect that assignment to existing WordPress or page-builder modules. It is a JavaScript package, not a WordPress plugin.
Does this work with Divi or another page builder?
Yes, when the builder lets you create the variants, assign stable CSS selectors, hide treatments by default, and add page-specific JavaScript. Verify the rendered selectors rather than relying only on their editor labels.
Why does eligibility run before the feature flag?
A visitor who cannot receive the tested experience should not be evaluated by this implementation. Checking the page and required targets first protects the experiment denominator from visits where no treatment could be applied.
How do I preview a variant?
Add the feature flag key and configured variant to the URL, for example ?001-about-page-heading-test=test_group_1. Eligibility still runs first, and an unknown value falls back to control.
What if visitors briefly see the control before the treatment?
That is client-side flicker. Load PostHog and the runner as early as your performance budget allows, keep treatments hidden by default, and consider a narrowly scoped fail-safe concealment for a critical above-the-fold target. Do not hide the entire page indefinitely.
What happens when PostHog does not load?
The runner waits for the configured timeout and then applies the default variant, which is control in this guide. The original page therefore remains usable.
Should I keep the experiment code after the test ends?
No. After implementing the final decision permanently, remove the experiment-specific modules, hiding CSS, and runner configuration. Retaining inactive experiment code makes future page changes harder to reason about.
External & Internal References
- PostHog Page Experiments on GitHub
- PostHog Page Experiments on npm
- PostHog installation guide for WordPress
- PostHog experiment naming guidelines
- PostHog installation methods for WordPress
- PostHog Experiments documentation
- PostHog JavaScript SDK documentation





Any tips for testing entire pages against each other on WP using PostHog, rather than just on-page elements? Would prefer PH route the traffic/keep track of how it performed.