
Installing PostHog on ClickFunnels is a small setup, but it has a large impact on how much you can trust your funnel data.
Once PostHog is installed correctly, you can see pageviews, button clicks, form activity, session recordings, funnels, and conversion paths inside PostHog. That gives you more than basic traffic reporting. It lets you inspect what visitors actually do inside the funnel before they opt in, book, buy, or leave.
This guide shows how to add the PostHog web snippet to ClickFunnels, where to place it, how to verify that it is firing, and what to check if the data does not appear.
What You Need Before You Start
Before you add the script, make sure you have:
- A PostHog account with your organization and project set up
- Admin access to the ClickFunnels funnel.
- Access to the funnel settings.
- The funnel domain or subdomain you want to track.
- A plan for what you want to measure after installation.
At minimum, PostHog should capture pageviews. For CRO work, you will usually also want to track form visits, form submissions, button clicks, checkout steps, or purchase events.
Step 1: Get the PostHog Web Snippet
Log in to PostHog and open the project you want to use for the ClickFunnels funnel.
Then go to:
Project settings -> Web snippet
Copy the JavaScript snippet from PostHog.
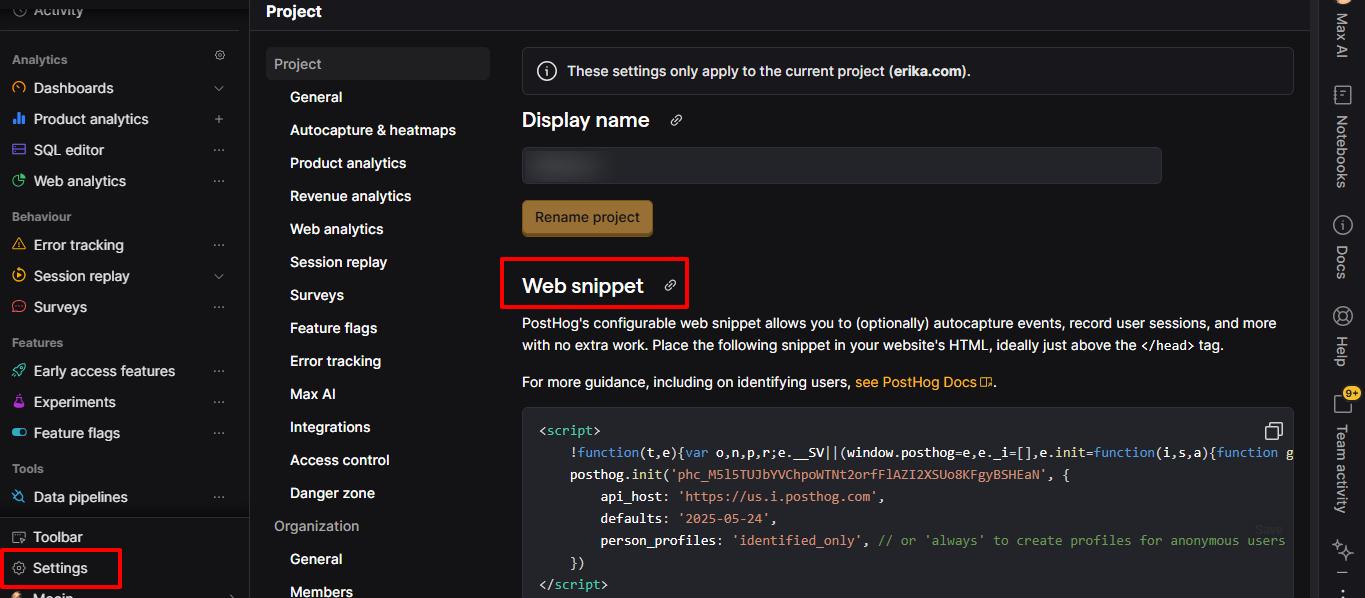
The snippet will include your project token and the PostHog API host. Do not copy a snippet from another project unless you intentionally want this funnel data to go into that project.
If you use separate PostHog projects for staging, client accounts, brands, or regions, pause here and confirm the project is the correct one. Sending production funnel data into the wrong project is easy to miss and annoying to clean up later.
Step 2: Review the Person Profile Setting
PostHog can capture anonymous events without immediately creating a person profile for every visitor. This matters because ClickFunnels traffic can be high-volume, ad-driven, and anonymous until someone submits a form or purchases.
In the web snippet, you may see a setting like this:
person_profiles: 'identified_only'
For many ClickFunnels installs, there are two reasonable options:
- Use
identified_onlywhen you mainly need event analytics and want to control person-profile volume. - Use
alwayswhen you want person profiles created for anonymous visitors too, such as when you rely heavily on session-level investigation, cohorts, or anonymous visitor history.
PostHog’s current person model separates anonymous events from person profiles. Anonymous events are still captured, but person profiles are normally created when a visitor is identified, when person properties are set, or when events include person-property updates.
If you are not sure which option to use, start with identified_only and only switch to always when you have a clear reason. More person profiles can be useful, but they can also increase noise and cost.
Here’s what our final snippet looked like:
Step 3: Add the Snippet to ClickFunnels
In ClickFunnels:
- Open your ClickFunnels dashboard.
- Select the funnel you want to track.
- Open the funnel settings.
- Find the Head Tracking Code field.
- Paste the PostHog snippet into that field.
- Save the funnel settings.
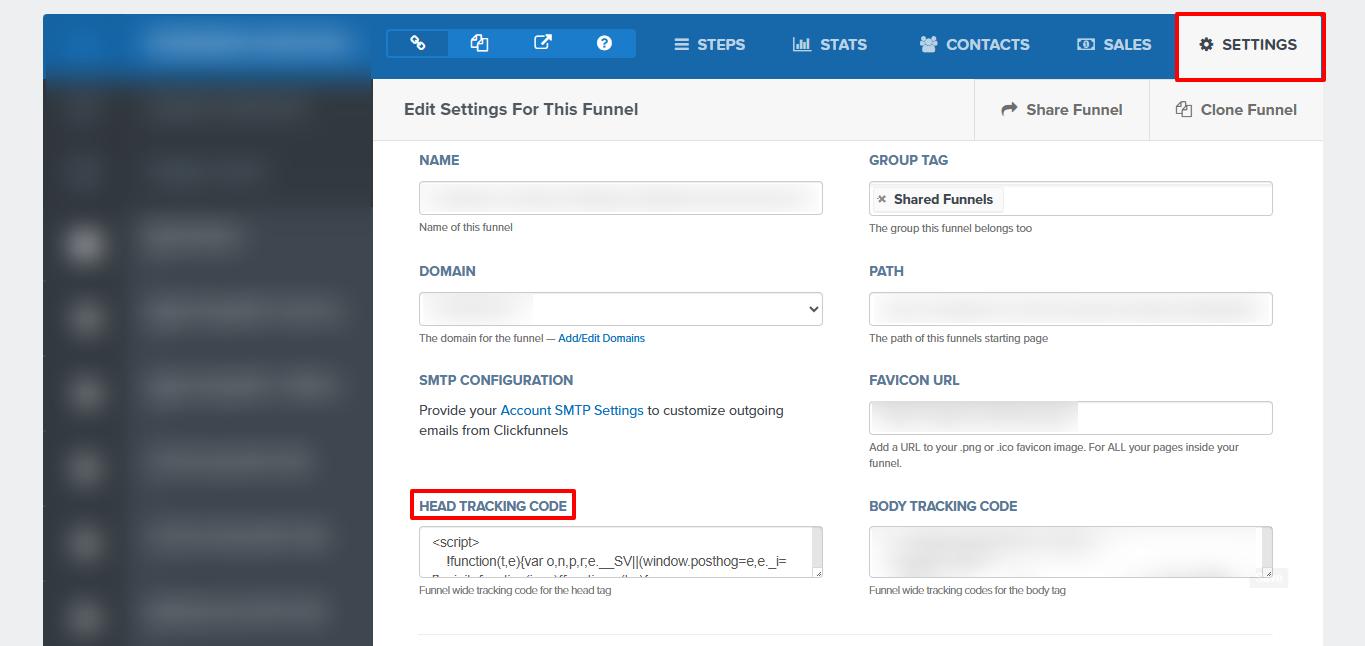
The head tracking area is the right place because PostHog should load on every funnel step as early as possible. This helps capture the first pageview and gives session replay, autocapture, feature flags, and other browser-side features a better chance to initialize correctly.
Step 4: Repeat the Setup for Other Funnels or Domains
Do not assume one ClickFunnels setting covers everything.
Repeat the install if:
- You have multiple funnels.
- You use multiple funnel domains.
- You use separate subdomains for sales pages, checkout pages, webinar pages, or thank-you pages.
- Some funnel steps are managed in another ClickFunnels workspace.
- Checkout or payment steps are hosted outside the funnel.
For example, if your traffic moves through:
offer.example.com -> checkout.example.com -> thanks.example.com
confirm PostHog is present on every step you want to analyze.
If PostHog only fires on the landing page, you may see traffic but miss the conversion path. That makes funnel analysis weaker because the drop-off after the first step is invisible.
Step 5: Publish or Refresh the Funnel
After saving the snippet, open the funnel in a browser.
Use a clean test visit:
- Open the live funnel URL.
- Accept or reject the cookie banner based on the behavior you want to test.
- Move through the funnel like a visitor.
- Click the main CTA.
- Submit a test form if safe.
- Visit the thank-you or next-step page.
If your site has a consent banner, test both consent states. PostHog should follow your privacy and consent requirements. If tracking should wait until consent, verify that no events are sent before consent is granted.
Step 6: Verify Events in PostHog
Go back to PostHog and open:
Activity
Then look for your recent test visit.
You should see events such as:
$pageview$pageleave- Autocaptured clicks or form interactions
- Any custom events you already send
PostHog’s JavaScript web SDK can automatically capture page navigation events and common interactions. That is why a basic install is enough to start seeing pageviews and some click activity.
For a ClickFunnels install, success looks like this:
- A
$pageviewappears when you load the funnel step. - The event URL matches the ClickFunnels page you visited.
- The event properties include useful page and referrer data.
- Moving to the next funnel step creates another pageview.
- CTA clicks or form interactions appear if autocapture is enabled.
- Session replay appears if replay is enabled and allowed by your settings.
Step 7: Create a Simple Funnel in PostHog
The install is only useful if it helps you answer business questions. After the snippet is verified, create a basic funnel in PostHog.
For a lead generation funnel, start with:
Pageview: landing page
CTA click or form visit
Form submit or thank-you pageview
For a sales funnel, start with:
Pageview: sales page
Checkout started
Purchase or order confirmation
If ClickFunnels does not expose a clean custom event for the conversion action, use the thank-you pageview as a first version. Later, improve the setup with custom events for lead_submitted, checkout_started, or purchase_completed.
Step 8: Add Custom Events for Important Actions
Autocapture is useful, but important funnel actions should eventually have named custom events.
Examples:
lead_form_submitted
webinar_registered
checkout_started
purchase_completed
upsell_accepted
upsell_declined
booking_started
booking_completed
If ClickFunnels lets you add custom JavaScript on a button, form, or confirmation page, you can send a custom event like this:
<script>
  if (window.posthog) {
    posthog.capture('lead_form_submitted', {
      funnel_name: 'main_offer_funnel',
      funnel_step: 'opt_in'
    });
  }
</script>
Place this only where the action has actually happened. A thank-you page is often safer than a button click because visitors can click a button and still fail to submit the form.
Common Mistakes to Avoid
Installing PostHog on only one funnel step
If the script is missing from checkout or thank-you pages, PostHog cannot show the full conversion path.
Using the wrong PostHog project token
Always confirm the project before copying the snippet. This is especially important for agencies managing multiple clients.
Forgetting custom domains and subdomains
Different ClickFunnels domains may need separate setup or verification. Test the actual public URLs, not just the editor preview.
Assuming autocapture is enough forever
Autocapture is good for discovery, but named events are better for reporting. Use custom events for the actions that matter to revenue, leads, or bookings.
Not checking consent behavior
If the funnel serves visitors in regions with consent requirements, make sure the tracking behavior matches your privacy setup.
Testing while ad blockers are enabled
Browser extensions can block analytics requests. Test once in your normal browser and once in a clean browser profile or incognito window with extensions disabled.
Ignoring person profile settings
person_profiles: 'always' can be useful, but it is not always necessary. Choose the setting based on how you plan to analyze people, cohorts, and session history.
Troubleshooting: PostHog Is Not Showing Events
If no events appear in PostHog, check these items in order.
Confirm the snippet is saved
Go back to ClickFunnels settings and make sure the code is still in the Head Tracking Code field.
Confirm you are testing the live funnel URL
ClickFunnels preview pages may not behave the same as published funnel pages. Test the live URL.
Confirm the project token is correct
Compare the token in ClickFunnels with the token in PostHog Project settings.
Check the browser console
Open developer tools and look for JavaScript errors. A broken script above the PostHog snippet can sometimes stop later scripts from running.
Check the network requests
In the browser network tab, filter for:
posthog
You should see requests going to your PostHog host.
Disable ad blockers for the test
Ad blockers and privacy extensions can block tracking requests. Use a clean browser profile for implementation QA.
Wait briefly, then refresh Activity
Activity is usually fast, but give it a moment and refresh before assuming the install failed.
Why This Matters for CRO
ClickFunnels is built to move visitors through a sequence. That sequence is exactly what you need to measure if you care about conversion rate optimization.
Without PostHog, you may know that a funnel produced leads or sales, but you may not know:
- Which step created the drop-off.
- Which buttons visitors clicked before leaving.
- Which pages had low engagement.
- Which traffic sources behaved differently.
- Which funnel variants deserve a proper A/B test.
- Whether mobile visitors are struggling with a form or checkout step.
PostHog turns the funnel into a measurable path. That makes it easier to improve the page, test offers, diagnose friction, and decide what to change next.
Frequently asked questions
Where do I paste the PostHog snippet in ClickFunnels?
Paste it into the funnel settings under Head Tracking Code. This lets PostHog load on the funnel pages where that setting applies.
Do I need to install PostHog on every funnel?
Yes, if you want each funnel tracked. Check every funnel, domain, and subdomain that visitors use.
How do I know PostHog is working?
Open the live funnel, then check PostHog Activity for a $pageview event from your test visit.
Will PostHog track button clicks automatically?
Often, yes. PostHog’s JavaScript SDK supports autocapture for common web interactions, including clicks and form activity. For important conversion actions, use named custom events.
Should I use person_profiles: 'always'?
Use it only when you need anonymous visitors to have person profiles. For many funnels, identified_only is a cleaner starting point because anonymous events are still captured without creating a profile for every visitor.
Can I track ClickFunnels purchases in PostHog?
Yes, but the best setup depends on where the purchase confirmation happens. A thank-you page event can work as a first version, while a dedicated purchase_completed custom event is better when available.
Does this replace Google Analytics?
Not necessarily. PostHog is stronger for product-style behavior analysis, funnels, session replay, and experimentation. Google Analytics may still be useful for traffic reporting, channel reporting, or existing marketing workflows.
What if PostHog does not show my test visit?
Check that the snippet is saved, the project token is correct, you are testing the live funnel URL, and your browser is not blocking analytics requests.
Can I use PostHog for ClickFunnels A/B tests?
Yes. Once PostHog is installed, you can use it to analyze funnel behavior and run or evaluate experiments. For page-level A/B testing, make sure variant assignment, events, and conversion metrics are clearly configured.
Will PostHog slow down my funnel?
The PostHog web snippet loads asynchronously, so it is designed not to block the page. Still, keep your tracking setup clean and avoid stacking unnecessary scripts in ClickFunnels.