

This guide explains how to send conversion events such as CompleteRegistration, Lead, AddToCart, InitiateCheckout, and Purchase to Meta, along with all available customer context and event metadata, including email address, first and last name, phone number, address information, order value, currency, and other matching parameters that help improve attribution and event match quality.
If you’re looking for PostHog integrations with other advertising platforms, see:
- PostHog <> Google: Event tracking integration
- PostHog <> Pinterest: Event tracking integration
- PostHog <> TikTok: Event tracking integration
- PostHog <> Reddit: Event tracking integration
- PostHog <> Snapchat: Event tracking integration
If you’d prefer a done-for-you implementation tailored to your business, fill out the Contact Us form and we’ll help design and deploy the appropriate tracking architecture for your setup.
Requirements
We assume you are already have PostHog setup and tracking the events you intend to send to Meta Ads. If not, go to installation guides in our PostHog articles.
Begin Here
PostHog has a feature called Destinations [Doc] that allows you to send your data to external systems in real time. Meta Ads Conversions [Doc] is a PostHog default destination that we will use to send conversion events to Meta Ads.
To start, navigate to ‘Data management’ and then to ‘Destinations’. Here, you can find your required destination by selecting ‘Meta Ads Conversions’. It’s worth noting that for each event type, you’re going to need a new Meta destination in PostHog. (This is not the case for Google and other ad platforms in PostHog, where they can handle all event types in a single destination.)
First, you should set the filters and triggers to select the PostHog events that should be sent to Meta. For instance you have an action name Order Completed that should be sent as a Purchase event. This is basically the mapping step.
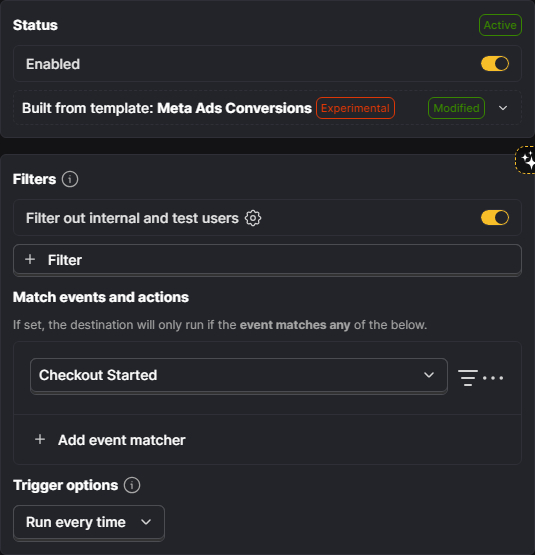
After filters and triggers, you’ll find event parameter fields. PostHog has set a decent default values there already. Some of the fields you see are common among all event types, but some need to be added/set depending on the event type. We’ll cover both in-depth:
Common fields
Event data
These are the fields you’re going to need to fill in for every event, regardless of what event it is.
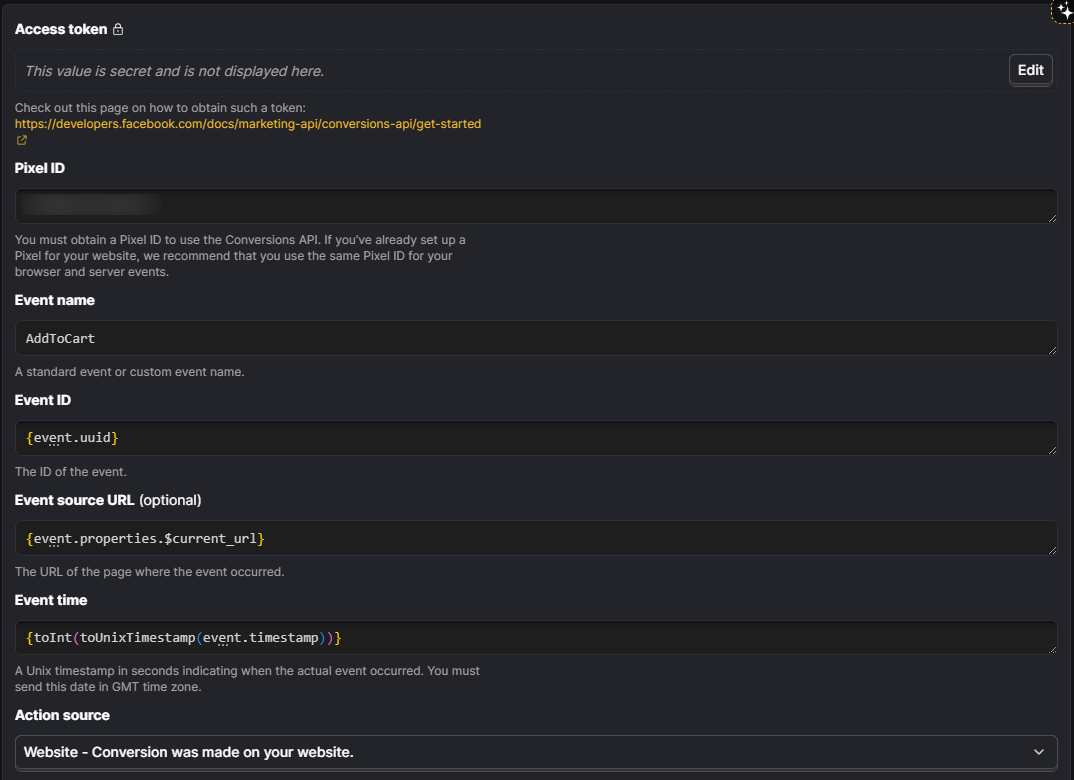
Access Token: It’s your authentication token. You can generate it from the Event Source settings in Meta.
Pixel ID: Specifies which pixel you want this event sent to. Found in your Meta Business Manager under your website pixel settings.
Event name: Which is the name of the event. (Case sensitive!)
Event ID: This is perhaps the most important field, as it directly determines how effective your deduplication process will be. Make sure it’s populated with a value that remains consistent every time the event runs. For example, for a Purchase event, use the Order ID; for bookings, use the Booking ID… or any similar variable that is generated only once per transaction.
Event source URL: The URL of the page where the event occurred (if it’s a web event, not for renewal transactions for instance). PostHog already prefills it with {event.properties.$current_url}.
Event time: The time when the event happened. If you have your own timestamp recording process, use it. Otherwise, just leave it as {toInt(toUnixTimestamp(event.timestamp))}.
Action source: Where the conversion occurred. Most of the time, simply “Website – Conversion was made on your website.”
User data
This is perhaps the second most important field, as it directly determines the quality of your Meta CAPI event and the fate of your campaign optimizations.
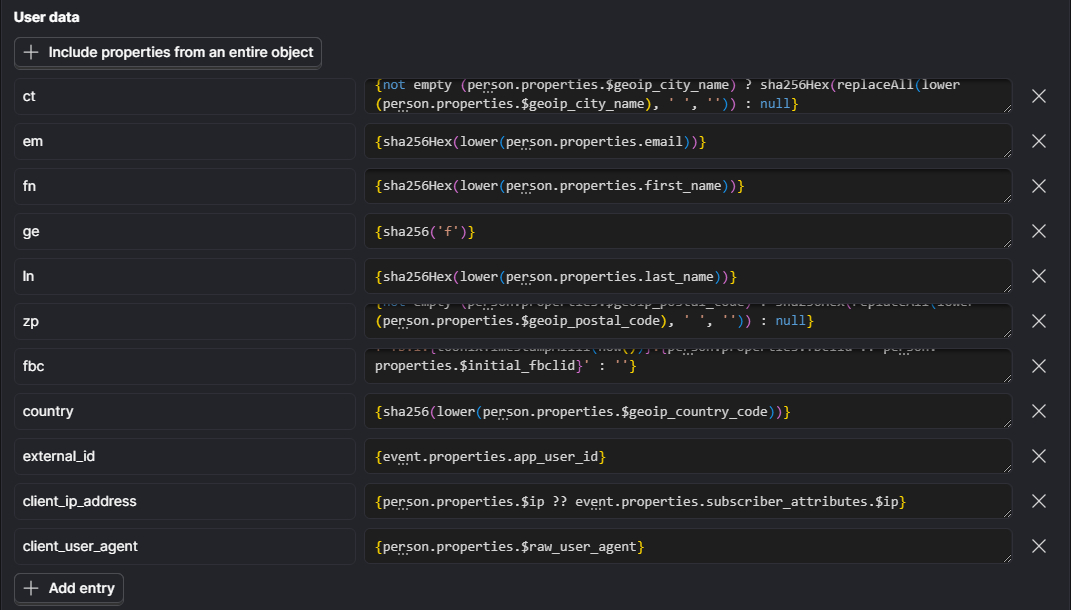
Fields that require hashing:
All of the following parameters need to be converted to lowercase, trimmed of whitespace, and hashed with SHA-256 before being sent.
em: Email address. If you set this property, you can catch it with this {sha256Hex(lower(person.properties.email))}.
ph: Phone number (digits only, including country code). Same as above, and it will be {sha256Hex(replaceRegexpAll(person.properties.phone, '[^0-9]', ''))}.
fn: First name. Same as above, it will be {sha256Hex(lower(person.properties.first_name))}.
ln: Last name. Same as above, it will be {sha256Hex(lower(person.properties.last_name))}.
ge: Gender. Same as above, it will be {sha256Hex(lower(person.properties.gender))}.
db: Date of birth. {sha256Hex(replaceAll(person.properties.date_of_birth, '-', ''))}.
ct: City. In case you don’t ask it from the user, you have the option to fill it with the city detected from the user’s GeoIP. In that case, it will be {not empty (person.properties.$geoip_city_name) ? sha256Hex(replaceAll(lower(person.properties.$geoip_city_name), ' ', '')) : null}.
st: State. Same as above, it will be {not empty (person.properties.$geoip_subdivision_1_name) ? sha256Hex(replaceAll(lower(person.properties.$geoip_subdivision_1_name), ' ', '')) : null}.
zp: Zip/Postal code. Same as ‘ct’. It will be {not empty (person.properties.$geoip_postal_code) ? sha256Hex(replaceAll(lower(person.properties.$geoip_postal_code), ' ', '')) : null}.
country: Country code. Same as ‘ct’. It will be {sha256(lower(person.properties.$geoip_country_code))}.
Fields that do not require hashing:
client_ip_address: This is usually {event.properties.$ip}, but make sure IP capture is enabled on your end. Also, confirm that this is the client’s IP address, not the server IP from which the backend event is being sent. In case you’re using external integrations like RevenueCat, you might find it in {event.properties.subscriber_attributes.$ip}.
client_user_agent: This may sound like gibberish, but it can hugely impact the event quality. Definitely send it if you have it. It can usually be found at {event.properties.$raw_user_agent}. But again, make sure it’s not the server user agent from which the backend event is being sent.
fbc: It is Meta’s way of preserving ad click context once a user lands on your website. It is derived from the fbclid query parameter that Meta automatically appends to your URL when someone clicks a Meta ad. Its purpose is to help Meta match downstream conversion events (Purchase, Lead, etc.) back to the specific ad, ad set, and campaign that generated the click. This significantly improves event match quality and attribution accuracy, especially for server-side events sent through the Conversions API.
Use the following expression to build it:{not empty(person.properties.fbclid ?? person.properties.$initial_fbclid) ? f'fb.1.{toUnixTimestampMilli(now())}.{person.properties.fbclid ?? person.properties.$initial_fbclid}' : ''}.
This expression checks whether a valid fbclid value exists on the user (either the current fbclid or the initially captured $initial_fbclid). if one exists, it constructs the required fbc string in Meta’s expected format:
- Prefix: fb.1. (static identifier required by Meta)
- Timestamp: current Unix timestamp in milliseconds
- Click ID: the available fbclid value
If no fbclid is available, the expression returns an empty string, meaning no fbc value will be sent.
If you don’t see any of these fields defined by default, you can add as many as you want by clicking on ‘Add entry’.
Event-specific fields:
Besides those common fields among all events, you may also need some extra fields depending on the event type. We’ll cover the most important ones based on our experience. For a full list of standard events and their parameters, visit Meta for Developers site. You can quickly add any parameters you want after this article.
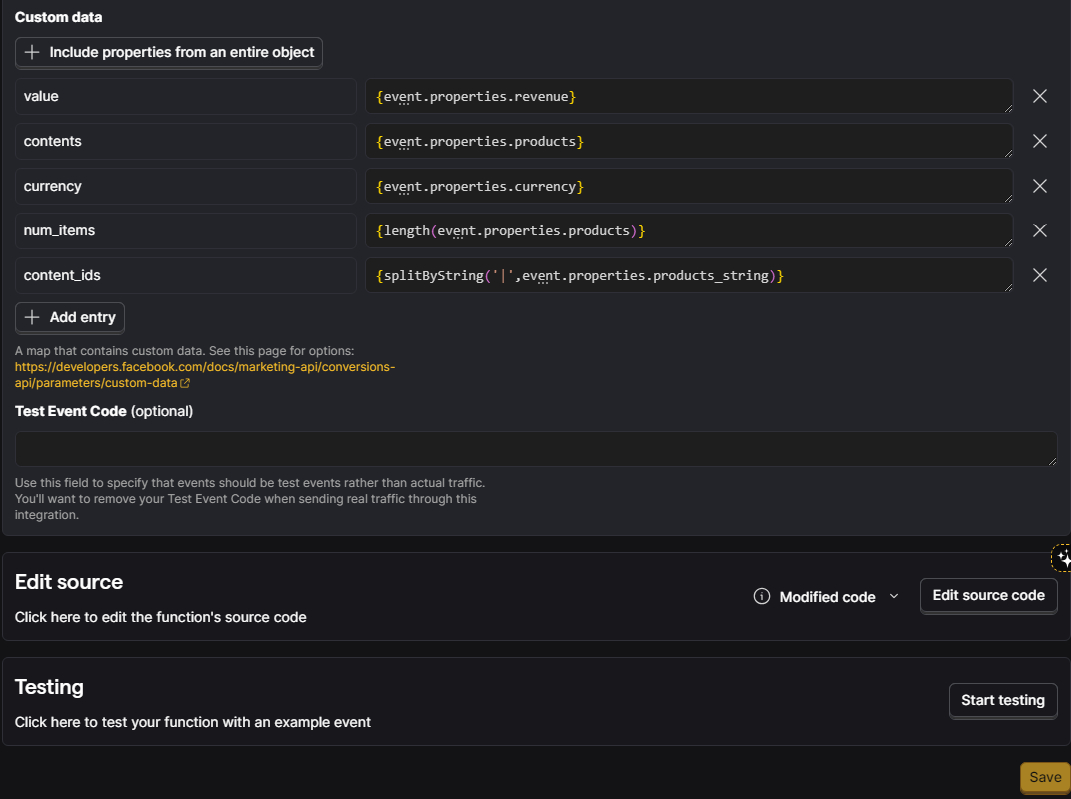
value:
May come with: AddPaymentInfo, AddToCart, AddToWishlist, CompleteRegistration, InitiateCheckout, Lead, Search, StartTrial, Subscribe, and ViewContent.
It’s the value associated with this event. (e.g. {event.properties.price})
currency:
May come with: AddPaymentInfo, AddToCart, AddToWishlist, CompleteRegistration, InitiateCheckout, Lead, Purchase, Search, Subscribe, and ViewContent.
It shows the currency for the value specified. (e.g. {event.properties.currency})
The currency and value fields always come together, and they are required properties for the Purchase event.
predicted_ltv:
May come with: StartTrial and Subscribe.
It’s the advertiser’s estimate of how much total revenue a subscriber will generate over their entire lifetime..
content_ids:
May come with: AddPaymentInfo, AddToCart, AddToWishlist, InitiateCheckout, Purchase, Search, and ViewContent.
The product IDs associated with the event, such as SKUs or article IDs.
content_type:
May come with: AddToCart, Purchase, Search, and ViewContent.
It’s either ‘product’ or ‘product_group’ based on the ‘content_ids’ or ‘contents’ being passed.
If the IDs being passed are IDs of ‘products’, then the value should be product. If product group IDs are being passed, then the value should be ‘product_group’.
contents:
May come with: AddPaymentInfo, AddToCart, AddToWishlist, InitiateCheckout, Purchase, Search, and ViewContent.
It’s an array of JSON objects that contains the quantity and the International Article Number (EAN), when applicable, or other product or content identifier(s). id and quantity are the required fields.
num_items:
May come with: InitiateCheckout and Purchase.
It’s the number of items when checkout was initiated. (e.g. {length(event.properties.products)})
search_string:
May come with: Search.
It includes the string entered by the user for the search.
Also, you can find the object properties that Meta needs you to send for any event through this link.
Important Note: Use test code
While testing, always use the Test Event Code that Meta provides so you can preview the data you’re sending. Get it from your Event Source settings. When you’ve finalized the setup, just delete it, and Meta will count all incoming events as real ones.
Final Word
I hope you found this article from 99Ways helpful. Everything shared here comes from hands-on experience implementing PostHog across dozens of businesses with similar growth and optimization goals.
If you’re looking for a full-service PostHog setup that goes beyond technical implementation, and is aligned with your actual business outcomes, we’d be happy to connect.
Feel free to fill out the Contact Us form to book a free consultation call with our co-founders.
Frequently asked questions
What is event match quality and why does it matter?
Event match quality is Meta’s measure of how confidently it can match a conversion event to a real user.
Higher match quality leads to:
Better attribution
More accurate reporting
Stronger algorithm optimization
PostHog improves this by sending rich user data (hashed email, phone, location, etc.), which increases the likelihood of a successful match.
Do I need both Meta Pixel and CAPI when using PostHog?
Yes. Best practice is to use both Pixel (client-side) and CAPI (server-side) together.
Pixel captures real-time browser activity
CAPI ensures reliability and data completeness
The key is proper deduplication using Event ID, so Meta does not double-count events.
What is event deduplication and why is Event ID critical?
Deduplication ensures that the same event sent from multiple sources (Pixel + CAPI) is counted only once.
The Event ID is the anchor for this process. If it’s inconsistent or missing:
Meta may double count conversions
Or fail to match events properly
Using stable identifiers like Order ID or Booking ID is essential.
Which PostHog events should I send to Meta Ads?
Focus on high-value, optimization-relevant events, such as:
Purchase
InitiateCheckout
AddToCart
Lead
CompleteRegistration
Sending too many low-signal events can dilute optimization. Prioritize events that directly correlate with revenue or meaningful intent.
Can I send custom events from PostHog to Meta?
Yes. PostHog allows you to map any custom event to Meta’s standard or custom events.
For example:
“Order Completed” → Purchase
“Booked Call” → Lead
The key is aligning your internal event structure with Meta’s expected event taxonomy.
What user data should I prioritize for better CAPI performance?
The highest-impact fields are:
Email (em)
Phone (ph)
First & last name (fn, ln)
Location (city, state, country)
IP address and user agent
These directly affect match quality and attribution accuracy, especially when hashed correctly using SHA-256.
Do I always need to hash user data before sending it?
Yes, for specific fields like email, phone, and name, Meta requires SHA-256 hashing before sending.
This ensures:
Privacy compliance
Standardized data formatting
Proper matching within Meta’s systems
PostHog expressions allow you to handle this directly in the destination setup.
What is the fbc parameter and why is it important?
The fbc (Facebook Click ID) preserves the original ad click context.
It connects a conversion event back to:
The exact ad
Ad set
Campaign
Without fbc, Meta may struggle to attribute conversions accurately, especially for server-side events.
What happens if I don’t send enough user data?
If user data is missing or incomplete:
Event match quality drops
Attribution becomes weaker
Meta’s optimization performance declines
In extreme cases, campaigns may optimize based on partial or misleading signals, leading to inefficient ad spend.
Can PostHog send events to multiple Meta pixels?
Yes. You can create separate destinations per event and per pixel, allowing:
Multi-brand setups
Multi-domain tracking
Segmented attribution strategies
This is especially useful for agencies or businesses operating multiple offers.
How does PostHog improve Meta Ads performance in practice?
By sending clean, enriched, and deduplicated events, PostHog helps:
Meta optimize toward actual revenue, not just tracked conversions
Reduce signal loss from browser limitations
Improve ROAS over time
The impact is usually seen in better scaling stability and more reliable decision-making.
Is PostHog CAPI setup enough, or do I need ongoing optimization?
Setup is only the foundation. Over time, you need to:
Audit event mappings
Update parameters as funnels evolve
Ensure new flows are tracked correctly
Without this, tracking gradually becomes misaligned with the business.
Can I use PostHog CAPI with platforms like Shopify or ClickFunnels?
Yes. PostHog can capture events from:
Shopify
ClickFunnels
GoHighLevel
Custom-built stacks
As long as events are tracked in PostHog, they can be mapped and sent to Meta via CAPI.
What are the most common mistakes in PostHog → Meta CAPI setups?
Based on real implementations, the most frequent issues are:
Missing or inconsistent Event IDs
Incorrect hashing of user data
Not sending enough user attributes
Wrong event mapping (e.g., Purchase vs Lead)
Ignoring fbc and attribution context
These directly reduce match quality and tracking reliability.
How do I test if my CAPI setup is working correctly?
Use Meta’s Test Event Code from Events Manager.
This allows you to:
Preview incoming events in real time
Validate parameters and structure
Identify missing fields or formatting issues
Always test before going live.
Does PostHog replace tools like Google Analytics or GTM?
No. PostHog complements them.
GA4 → general analytics
GTM → tag management
PostHog → product analytics + event pipeline
For CAPI specifically, PostHog acts as a data source feeding enriched events into Meta.
Can PostHog handle multi-step funnels and delayed conversions?
Yes. PostHog tracks user behavior across sessions and events, allowing you to:
Capture delayed purchases
Track multi-step funnels
Attribute conversions beyond a single session
This is critical for high-ticket or longer buying cycles.
Is this setup compliant with privacy regulations like GDPR?
PostHog and Meta both provide frameworks for compliance, but implementation matters.
Key requirements:
User consent (cookie banners, tracking consent)
Proper hashing of personal data
Transparent data usage policies
Compliance depends on how you implement, not just the tools.
When should I hire an expert for PostHog CAPI setup?
You should consider hiring an expert if:
You’re spending significant budget on ads
Your funnels are multi-step or cross-platform
You rely on accurate attribution for scaling decisions
A proper setup directly impacts data quality, optimization performance, and revenue decisions, so mistakes can be expensive.


I used this setup to connect Purchase events from PostHog to Google, but noticed Google was flagging them with a “Needs attention” warning:
“You are only importing events that have both user-provided data (eg, email, phone number) and Google identifiers like GCLID. To get the maximum measurement and performance benefits, Import all of your events that have user-provided data, even those without GCLID.”
The fix is straightforward. Instead of filtering only for events that include a GCLID, update your SQL filter to:
“person.properties.gclid IS NOT NULL
OR person.properties.email IS NOT NULL”
This allows Google to use either GCLID or user-provided data for matching, improving event coverage and performance.